
Ok, you have an idea. Maybe you have even gone out and started to source fabrics. But, how do you turn your idea into reality? Well, simply put the answer is the tech pack. And as always virtue + vice is offering an in-depth guide and fashion tech pack template for free!
But, before we get started
Have you heard about the super secret document that everyone in the fashion industry uses, but no one is talking about? Probably not. That is because you can't find it on Google or Instagram (believe me, I've tried).
It's a form I have used for over 13 years at every job I have ever had. Literally everyone from brands to fabric suppliers use it, but you can't find it anywhere publicly.
The best part? It can cut your sourcing time in half, and save you tons of money in product development! This is the kind of info consultants charge the big bucks for. And, I'm giving it away for free until the end of the month.
So, get ready to make fashion startup life a whole lot easier, and GRAB YOUR FREE DOWNLOAD OF THE NOT-SO-SECRET SOURCING DOC HERE
What is a tech pack?

A tech pack, also known in the industry as a technical packet or specification sheets, is basically, super detailed instructions on how to make a garment during the sampling and manufacturing process. You can think of it as a recipe, for clothes. In a tech pack everything that goes into making the garment and instructions on how it should be made - fabrics, stitches, measurements, colors, and more, are listed along with photos and CADs (computer aid designs, basically sketches).
Tech packs are also handy to use as a working document where all changes and revisions from the process of sampling through to production can be kept in one place.
Why are tech packs important?
Tech packs are important because most factories will not work with you if you do not have them. When you first start approaching factories to partner with, the first thing they will ask for is a tech pack. Do your self a favor, and hold off on approaching factories if all you can say is "I am making the best fitting yoga pants made out of recycled plastic". You will sound like an amateur and the factory will not take you seriously. Even if they do agree to work with you, I can promise they will prey on your naivety and probably overcharge you by at least double.
So, get yourself organized, and looking professional before you start your outreach. Scroll down to the bottom of the post to see an example of a professional email to send to potential factory partners.
Why do factories require tech packs?
clear communication
Do you remember how I mentioned in my fabric sourcing guide that you want to keep communication down to a minimum? Factories just want to know the crucial bits of info that are needed to make your clothing. They aren't into small talk. By using a tech pack everything they need to know is in once place, clear, concise, and easy to use. It saves them time. And whenever you can do something to save a factory time they love you a little more.
ensures nothing is forgotten
By using this tried and true method of tech packs you will ensure that nothing is forgotten. Nothing drives factories crazier than receiving only 1/2 the info they need. By using the tech pack document you will be able to make sure you are giving your manufacturer everything they need in an efficient manner.
organizational
A tech pack tracks everything. As revisions are made they are added to the tech pack. This will allow you to open one document and see where your product started and where it is now. This will end any confusion about the evolution of the product and what was or wasn't changed.
good for teamwork
A tech pack is basically your garments bible. As I mentioned, a few times, ALL of the info needed is right there in one place. This makes sharing with a team easy because everyone has access to the same thing at the same time - from designers to the sales team.
Did I sell you on the tech pack? I hope so. So, here is how to make your own.
Let's dive in. Many brands will hire someone to create tech packs for them, this person is a technical designer. But, this can be expensive, and you can probably get by with bootstrapping. For example, techpacks.co charges between $375-$1095. Do not pay this much! You are getting taken advantage of. As a startup, there are deifinitly better things you could be spending your money on. So, here is everything you need to DIY.
What does a tech pack include? A quick and Easy tech pack checklist

technical sketches
These sketches are also known as flats. That is because they are drawings of how a garment would look it if were spread out flat on a table. Usually, there are at least two sketches here, (but there can be more) of the front and the back of the garment. Sometimes there is even a close-up sketch of a detail.
sample sizes and measurements
Generally, brands chose a size small or medium to sample in. This part is every measurement of all the dimensions of the garment in that single size.
construction details
This sketch points out all the details of the garment like strap sliders, buttons, plackets, or anything else noteworthy. The construction details can also be on the technical sketches to save time and printer paper.
BOM (bill of materials)
In your garment recipe think of this as the ingredients list. It is a list of every single material that will go into your garment from labels and tags to fabric and thread.
stitches and seams
This section calls out exactly how the garment should be sewn
branding and artwork
Tag and label artwork go here. As well as artwork for fabric prints or screen hits for graphic tees.
grading measurement / specs
After you get your perfect sample in your sample size, in production you will need to make additional size options. This section gives measurements for each garment in every size.
point of measure instructions
These are directions for how the garment should be measured to ensure it matches the sample size and grading measurements. It leaves no room for interpretation.
How To Use Techpacker

Now, let's take a deeper look at each section and everything that is included.
The point of my blog is to help give people the tools and references they need for free. But, sometimes you need a little help. And, that's where Techpacker comes in. Techpacker promises to "create professional tech packs in minutes". Pricing starts at $35 per month and goes up to $515. So, are they as easy to use as they say? While I walk you through each step of creating a tech pack, I'll also let you know just how long it took me to create on Techpacker and if it was as easy as they say.
sign up
I signed up for the 7-day free trial. All you need is your name, company email, and to create a password. No credit card is required. You will then get an email to confirm your email address.
time: 1 minute
create an account
More bookkeeping. Here you will need to list your position in the company, organization name, what exactly your company does, and how many employees the company has. They also require you to give a phone number. Ummmm, no thanks, I made up a fake one. I don't need any more solicitation phone calls, thank you.
time: less than 1 minute
ok, we're in. getting started
You will be directed to a getting started page that will teach you how to use Techpacker. That's definitely handy. I always have a bit of a struggle learning a new computer program. The instructions even include a youtube video.
watching the video and reading the instructions took about: 3 minutes
create the tech pack file, this will become your cover page

name the style
women's t-shirt
give a short description
100% organic cotton fair trade t-shirt
upload a photo for the cover page
Photos are super helpful for saving time. In general, any visual that allows you to quickly look at something and know exactly what is being referenced is helpful.
Production sizes
What sizes will the shirt be made in during production? I chose small, medium, and large.
sample size
Next, we need to enter what size the sample should be made in
I chose small. I chose small because I am a size small and I often use myself as a fit model in a pinch. If you want to save some cash and skip hiring a fit model, use yourself. Just make sure your sample is made in your size.
units of measure
Inches or cm? I chose inches because that is what the US, India, and China are generally most comfortable working in.
color
White
sample color
White. This needs to be specified if you are making the shirt in more than one color.
keywords
This should make searching for the style easy in the Teckpacker platform. I just chose the season spring and summer.
time to create the file: 2 minutes
After I did all of these steps my screen froze. So I had to reload the page. Luckily everything was saved. Full disclosure I tried out Techpacker about 3 or 4 years ago when they were first getting started. The platform was horrible and a total waste of time. So far the experience was so much better. They made so many improvements over the past couple of years.
important details
On Techpacker details are added on "cards". Cards are basically all the different sections I listed above. The core three cards are sketches, materials, and measurements. If you want to get fancy you can also add fit, costing, and quantity break down. The extra three will be more important during production.
technical sketches

Ok, so I got cocky here and tried to upload the sketches without watching the instructional video. The upload and labeling are not that intuitive, so I would definitely recommend watching. It's only 2 minutes long.
watching the video on how to add cards: 2 minutes
Back to sketches…
I can't draw. So I googled "technical sketch of a t-shirt". Boom got it. The internet is full of photos, sketches, and information. Use it. The factory does not care if there is a watermark on it. All they care about is the info.
annotations
Once the technical sketch is uploaded you can add annotations. What should be annotated? All of the construction details I mentioned earlier. Here is a quick reference list of what to call out.
types/colors of fabrics and where they go
I call out that my neckband should be a 2x2 rib and that my main body fabric is interlock.
how to call out colors
My shirt is all white, but let's pretend I was making the shirt with contrast sleeves in two colorways. White with blue sleeves, and white with green sleeves. The shirts should be labeled like this. Color 1 and Color 2. On the materials page, you will be given the opportunity to call out colors. This system of numerical labeling makes it easy to mix, match, and change colors.
next call out details
trims, buttons, labels, pockets, stitching, etc. How do you know what to add? How much is too much? Techpacker does something really nice for us. They give us 18 free tech packs to use as a reference. Their references range from dresses, to pants, to swimsuits. So, if you have no idea what you are doing take a look at one of their templates and use it as a guide!
If you don't know the type of stitching you want, go shopping and find something similar you like. Take photos, and then get to googling. There are lots of references for stitch types on the internet. You can even attach photos of the seams you want from other garments to add clarification.
For my white t-shirt, uploading sketches and annotating took me about 5 minutes. For people who are newbies, it's going to take a lot longer. But, don't get discouraged, you will get faster the more you do it.
Again, you can add keywords.
I didn't. And, there is a comments section. The last options are status and dates.
This is pretty cool. It lets you put in the date that you made the tech pack, and takes notes about when you changed things. Remember tech packs are living and breathing documents, they are constantly changing as designs change. And, the Techpacker program allows you to keep track of all of that.
materials

This is your ingredients or shopping list. Everything needs to go on here. You know how in recipes they list salt and eggs. Even though most of us have salt and eggs in our homes already. But, it still needs to be listed in the recipe. Same goes for garments. It might seem like factories have endless supplies of sewing thread or buttons. But, that's because their tech pack recipes tell them to buy those things. So, make sure absolutely nothing is forgotten.
to make my garment I need
1. white 2x2 rib fabric
This is the fabric for my neckband. Rib has better stretch and recovery than jersey or interlock fabric. For why I made this design choice, check out this article on designing the best white t-shirt.
2. white interlock fabric
Interlock fabric holds up better than jersey. And, I want my shirts to last as long as possible and not end up in the landfill. Although interlock can be a lot more expensive, I think it's worth it to put out a quality product.
3. thread for sewing
I chose a polyester thread because it is stronger and will create fewer design issues and defects during production. Some technical brands will even opt for nylon threads because they are even stronger, but the downside is they are more expensive. And, for a plain white t-shirt, it's not necessary
4. a brand label
This is just my logo. It goes in the center back of the inside of the shirt below the neckband. As a supplemental page, to your tech pack, you can add CADs of your labels. Here is what mine looks like.
5. a care label
A care label should include the following information at the very minimum
Fiber Content
What fibers is the shirt made of? Rayon? Linen? Silk? Mine is 100% GOTS cotton
COO aka, country of origin (where the garment was made)
Made in India
Care Instructions (how to wash the garment)
Wash in cold water, tumble dry on low. I chose to tumble dry on low because knits like to shrink a lot in the dryer and less heat helps to prevent this.
6. a hangtag
I make mine out of recycled cotton scraps from the factory floor. The factory collects the cotton and turns it into a special type of paper.
and, a polybag
Unfortunately, this is totally necessary. Check out this study by Patagonia on how skipping this step actually creates more waste…
time to add all the clothing materials: about 5 minutes
materials supplier
See the column that lists supplier. I put virtue + vice. This means that I will be sourcing all of these components myself and having them sent to the factory for my t-shirt. If you want the factory to arrange for sourcing you could put the factory name here. Or, if you have a nominated supplier (this means a supplier you want the request the factory work with), you can list this supplier and have the factory work directly with them for you.
measurements


Ok, this is probably going to be the hardest part for most of you. What are the important measurements to give to the factory? And, how do you know how to measure them? Luckily Techpaker gives some references to use as a base. Also, use google.
Measurements are the guide that the pattern maker uses to create the pattern. If the measurements are off, the pattern will be off, and that means the garment will be off and fit weird. So, take your time to make sure you list all the measurements just right.
learning curve
And, do you know what? If you forget a measurement or two, it's ok. The factory will just ask you for it, and you can easily add it into the tech pack and mark a revision. Don't stress yourself out here, there is going to be a learning curve. The good news is with Techpacker references, and google you should be able to figure it out on your own and save money!
The easiest way to show the right way of measuring the garment is through pictures of points of measure.
Here is what I need the factory to measure to ensure my shirt is the right size and fits the right way. I am using industry lingo to help you learn it too.
The measurements I am going to use in this tech pack is for one of my clients' COOL MOM. COOL MOM's goal is to spread awareness that the U.S. is the only developed nation on earth currently lacking a paid federal paternity leave policy.

Let's start with HPS. HPS stands for high point shoulder. This is the highest point on the garment. In the t-shirt, it is where the sleeve meets the neckband. To measure the front length from the HPS first we find the high point shoulder. The HPS is i the sketch is the pink dash line. And then we measure down to the bottom seam.
CB stands for center back. Basically, we do the same thing as the front length from HPS for the back of the shirt. In this example for COOL MOM, the back of the shirt is 1" longer than the front.

This measures how wide the shirt is at the bottom seam.
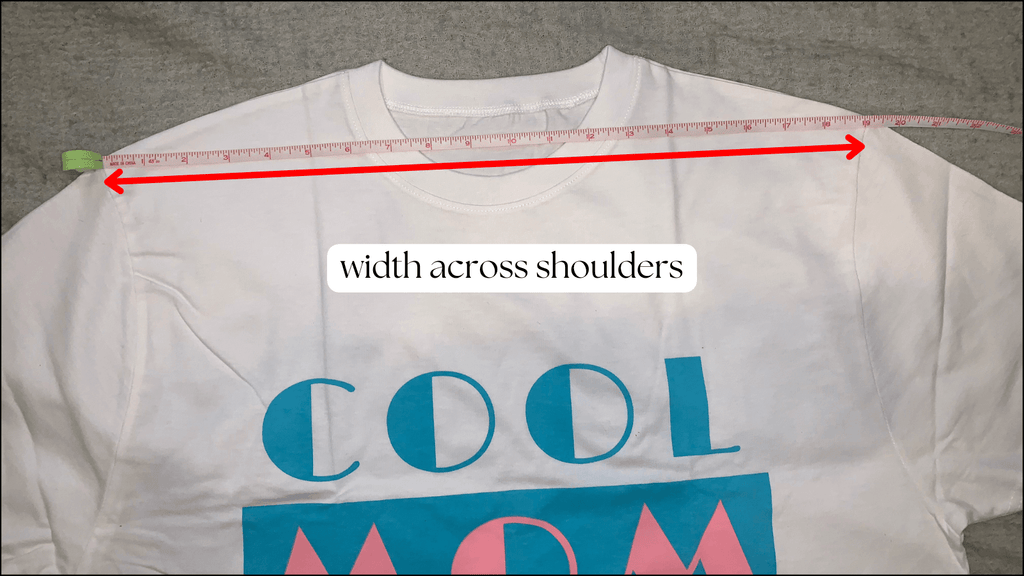
From shoulder seam to shoulder seam.

Measure the shirt from side to side 2" below the armhole. Everyone has a reference point where they like to measure from, some brands measure 1/2" below the armhole. In fast fashion, we always did 2" below so that is what I usually do.

How wide is the top of the neck opening, in alignment with the HPS?

From the HPS, what is the measurement to the top of the neckband?

Same as the front neck drop, but the back of the garment.
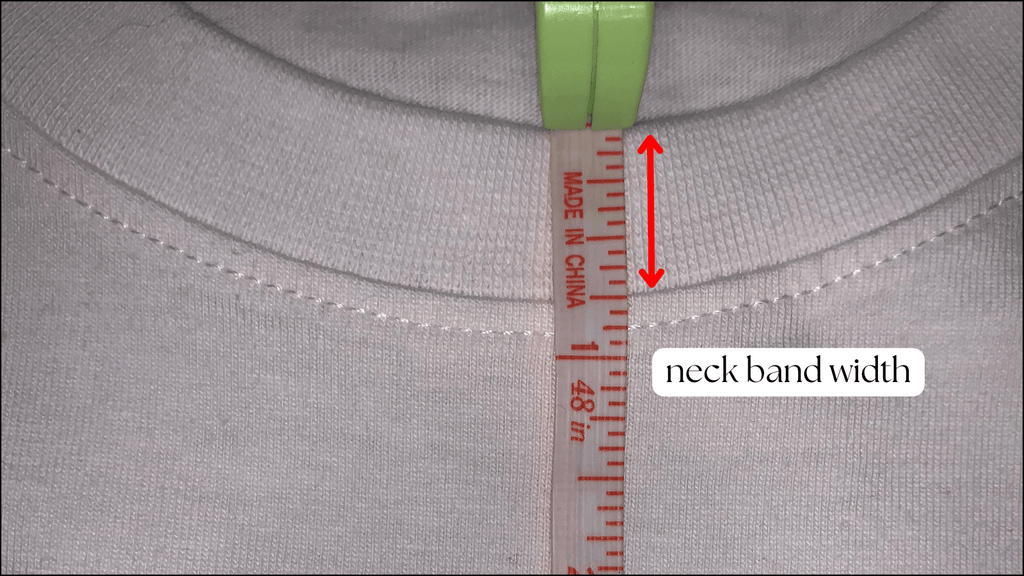
How wide is the neckband?

From the shoulder seam to the bottom of the sleeve.

From the armpit to the bottom of the sleeve

How wide is the opening for the armhole?

How wide is the bottom of the sleeve
Measuring, entering the data, and creating points of measure CADs in Canva took me about 15 minutes. It will probably take you longer your first few times. What took me the longest was making the graphics in Canva of how to measure.
What is tolerance?
The tolerance is how off the measurements can be. In fast fashion, we allowed for 1/2 inch bigger or smaller. Remember people are making your garments, not robots. There will b some human error.
One thing Techpacker forgot...
A timeline. Remember to list somewhere on your timeline when you will need samples by, and when you will be placing your production order. This helps the factory plan ahead, and ensure everything ships to you on time.
Update: I spoke with Techpacker after publishing this post (BTW, Techpacker had no idea I was reviewing their product). The team let me know that in the near future they are going to be adding a Time + Action calendar. I can't wait to see the updates, and will review the new services once they roll out!
And, we did it! We made a Tech Pack!
My review of Techpacker? I like it. I think that if you do not have experience in adobe illustrator, and are a small company with a tight budget who might not be able to afford to hire a technical designer, this is a perfect DIY solution. It takes a little bit of time to teach yourself, and learn the program. But, I think in the long run it will save brands that choose to go this route a lot of money during their fashion design process.
having trouble? hire a pro!
Techpacker will match you with a freelance designer to help you develop your tech packs for only $65 per style (that is A LOT cheaper than the competitors).
Email the factory
Once you have your tech pack ready it is time to email the factory. And, here is what that email should look like:
Hi (factory contact here),
My name is ____________, and I am the ____________ of the brand ____________. I found you ____________ and would like to discuss manufacturing options. This is our ____________? (Remember, be honest here), and we make about ____________ styles per season, ____________ pices per style..
Please see the attached tech pack to get an idea of the product we make. (you don't have to attach every tech pack for every style 2 or 3 is enough).
Thank you, and looking forward to working together.
Cheers,
____________
Leave a comment